


At Move Work Forward we build products that improve team visibility, communication, coordination, and productivity. One of our newest products is Model Viewer for Outlook, an Outlook add-in that lets professionals preview 2D and 3D models directly inside their inbox without switching tools.
The add-in’s UI is a React single-page application. We wanted a globally distributed, low-maintenance setup, so we decided to use S3 and CloudFront, and manage the infrastructure with AWS SAM.
Setting up S3 and CloudFront within AWS SAM was straightforward — there are plenty of guides online — but adding a custom domain was more challenging. In this post, we walk through how we configured the infrastructure, deployed the UI, and connected a custom domain, all using AWS SAM to automate everything.
Note: In this post — we assume you are already familiar with React (for the demo we use React + Vite). If you want to jump straight to the code, everything is in the demo repository.
Architecture & Tools
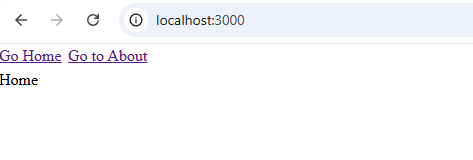
The React app we’re deploying is intentionally simple. It was created using Vite’s react-ts template, stripped down to the basics, and uses wouter for routing. There are two routes /home and /about plus a small Not Found page. And a couple of link elements let us navigate between routes.
To keep things focused, we’ll only deploy the minimal resources required to get everything running. You can expand or modify the setup later to match your own system.
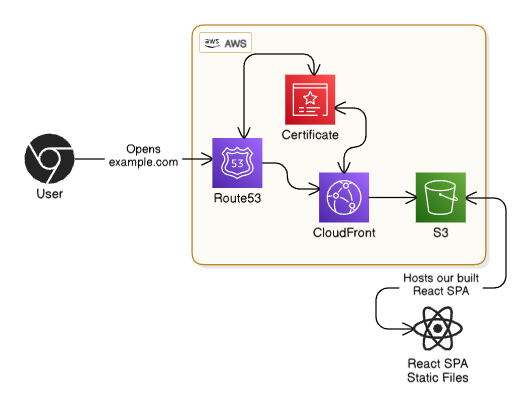
To deploy our React app, we’ll need a few AWS resources:
- S3 Bucket — Hosts the built SPA files
- CloudFront Distribution — Serves the files from S3 and handles caching
- ACM Certificate — Automatically generated so we can secure our domain over HTTPS
- Note: For automatic validation to work — we need to use DNS validation, our domain’s Hosted Zone Id and the Domain must be hosted on AWS
- Route53 Hosted Zone — Used for validating the certificate and routing the domain to CloudFront
We’ll also use a few tools:
- CloudFormation — Lets us describe our infrastructure as code
- AWS CLI — For interacting with AWS from the terminal
- AWS SAM — A developer tool focused on serverless infrastructure. It extends CloudFormation and provides a very convenient CLI for packaging and deploying our app. Even though it’s serverless focused, we can use it for anything CloudFormation supports
- Bash — For a small deployment utility script to build and sync our SPA to S3
Setting up the infrastructure files & utility script
We’ll start by creating a samconfig.yml. This file defines how the SAM CLI behaves for this project. It isn't required, but it saves a lot of typing by avoiding repeated CLI arguments.
version: 0.1

default:
  deploy:
    parameters:
      region: us-east-1
      resolve_s3: true # Automatically create SAM S3 bucket if not created yet
      capabilities: CAPABILITY_IAM
      confirm_changeset: true

production:
  deploy:
    parameters:
      stack_name: react-cf-production
      s3_prefix: react-cf-production
      region: us-east-1
      resolve_s3: true
      capabilities: CAPABILITY_IAM
      confirm_changeset: true
The default section applies when we run sam deploy. The production section applies when we run sam deploy --config-env production.
Now let’s create the SAM template. This file (usually template.yml) defines everything AWS needs to deploy our infrastructure.
Here’s the basic structure:
AWSTemplateFormatVersion: 2010-09-09
Transform: AWS::Serverless-2016-10-31

Description: SAM Template for React SPA, S3, CloudFront and Custom Domain

Parameters:
# Parameters for dynamic configuration
Resources:
# AWS resources like S3 buckets, CloudFront, etc.
Outputs:
# Values exported after deployment
Parameters
Let’s add the parameters we’ll need — by specifying Domain and HostedZoneId, the template is dynamic enough to be re-used across multiple environments:
Parameters:
  Domain:
    Type: String
    Description: Domain to connect with UI - has to be registered on AWS
  DomainHostedZoneId:
    Type: String
    Description: Hosted Zone Id of the Domain - will be used to automatically add DNS Record for Certificate Validation
If your domain was purchased through AWS, then Route53 created the Hosted Zone automatically. You can find the Hosted Zone ID in:
Route53 -> Hosted Zones -> Find your domain in the list

Resources — ACM Certificate
We’ll start with the certificate — the certificate is later on connected with CloudFront distribution, letting CloudFront know which certificate to use when user tries to access CloudFront thru our custom domain:
# Certificate for Domain
DomainCertificate:
  Type: AWS::CertificateManager::Certificate
  Properties:
    DomainName: !Ref Domain
    ValidationMethod: DNS
    DomainValidationOptions:
      - DomainName: !Ref Domain
        HostedZoneId: !Ref DomainHostedZoneId
    Tags:
      - Key: Name
        Value: !Sub '${AWS::StackName}-domain-certificate'
We’re using CloudFormation intrinsic functions like !Ref and !Sub throughout the template. They help us reference parameters and other resources.
Resources — S3
# UI S3
UiBucket:
  Type: AWS::S3::Bucket
  Properties:
    BucketName: !Sub '${AWS::StackName}-ui-bucket'

# UI S3 Bucket Policy - Allowing our UI CloudFront Distribution to get objects
UiBucketPolicy:
  Type: AWS::S3::BucketPolicy
  Properties:
    Bucket: !Ref UiBucket
    PolicyDocument:
      Id: !Sub '${AWS::StackName}-policy-for-ui-cloudfront'
      Version: 2012-10-17
      Statement:
        - Sid: !Sub '${AWS::StackName}-read-statement-for-ui-cloudfront'
          Effect: Allow
          Principal:
            Service: cloudfront.amazonaws.com
          Action: s3:GetObject
          Resource: !Sub '${UiBucket.Arn}/*'
          Condition:
            StringEquals:
              AWS:SourceArn: !Sub arn:${AWS::Partition}:cloudfront::${AWS::AccountId}:distribution/${UiCloudFrontDistribution}
The bucket is simple, but the bucket policy is important: it allows only our CloudFront distribution to read the files. We reference our CloudFrount distribution defined below.
Resources — CloudFront
# UI CloudFront
UiCloudFrontDistribution:
  Type: AWS::CloudFront::Distribution
  Properties:
    DistributionConfig:
      Comment: !Sub '${AWS::StackName}-ui-cloudfront'
      PriceClass: PriceClass_All
      Enabled: true
      Origins:
        # Point to our UI S3 Bucket so CloudFront looks for files there
        - DomainName: !GetAtt UiBucket.RegionalDomainName
          Id: !Sub '${AWS::StackName}-ui-origin'
          OriginAccessControlId: !GetAtt UiOriginAccessControl.Id
          S3OriginConfig: {}
      DefaultCacheBehavior:
        AllowedMethods:
          - GET
          - HEAD
          - OPTIONS
        TargetOriginId: !Sub '${AWS::StackName}-ui-origin'
        # Sets AWS Managed Caching Optimized Policy Id - Source: https://docs.aws.amazon.com/AmazonCloudFront/latest/DeveloperGuide/using-managed-cache-policies.html#managed-cache-caching-optimized
        CachePolicyId: 658327ea-f89d-4fab-a63d-7e88639e58f6
        # Sets AWS Managed S3 Cors Origin - Source: https://docs.aws.amazon.com/AmazonCloudFront/latest/DeveloperGuide/using-managed-origin-request-policies.html#managed-origin-request-policy-cors-s3
        OriginRequestPolicyId: 88a5eaf4-2fd4-4709-b370-b4c650ea3fcf
        ViewerProtocolPolicy: redirect-to-https
      CustomErrorResponses:
        - ErrorCode: 403
          ResponseCode: 200
          ResponsePagePath: /index.html
        - ErrorCode: 404
          ResponseCode: 200
          ResponsePagePath: /index.html
      Aliases:
        - !Ref Domain
      ViewerCertificate:
        AcmCertificateArn: !Ref DomainCertificate
        SslSupportMethod: sni-only
        MinimumProtocolVersion: TLSv1
    Tags:
      - Key: Name
        Value: !Sub '${AWS::StackName}-ui-cloudfront'

# CloudFront Origin Access Control that secures S3 origin access to CloudFront only
UiOriginAccessControl:
  Type: AWS::CloudFront::OriginAccessControl
  Properties:
    OriginAccessControlConfig:
      Name: Sub '${AWS::StackName}-ui-origin-access-control'
      OriginAccessControlOriginType: s3
      SigningBehavior: always
      SigningProtocol: sigv4
The key parts here are:
Aliases: lets our CloudFront distribution know any other domains we wish to use to reach it apart from the generated one (e.g.d111111abcdef8.cloudfront.net)ViewerCertificate: tells our CloudFront which ACM Certificate to use when viewer (e.g. user) tries to access cloudfront thru our custom domain - we connect it to the Certificate we defined at the startCustomErrorResponses: needed for SPA routing (fallback toindex.htmlwhich is our SPA entrypoint)
If you wish to learn more about all the options for CloudFront you can check out the official documentation.
Resources — Route53 Records
# DNS Records that point towards UI CloudFront Distribution
UiRecordSetIpV4:
  Type: AWS::Route53::RecordSet
  Properties:
    HostedZoneId: !Ref DomainHostedZoneId
    Type: A
    Name: !Ref Domain
    AliasTarget:
      DNSName: !GetAtt UiCloudFrontDistribution.DomainName
      HostedZoneId: Z2FDTNDATAQYW2 # CloudFront always has this hosted zone id

UiRecordSetIpV6:
  Type: AWS::Route53::RecordSet
  Properties:
    HostedZoneId: !Ref DomainHostedZoneId
    Type: AAAA
    Name: !Ref Domain
    AliasTarget:
      DNSName: !GetAtt UiCloudFrontDistribution.DomainName
      HostedZoneId: Z2FDTNDATAQYW2 # CloudFront always has this hosted zone id
These DNS records point our domain to the CloudFront distribution (A is for IPv4 while AAAA is for IPv6. Our CloudFront distribution has IPv6 support enabled by default.
Outputs
Outputs:
  DomainCertificateArn:
    Description: Arn of the Domain Certificate
    Value: !Ref DomainCertificate
  UiBucketName:
    Description: Name of the UI S3 Bucket
    Value: !Ref UiBucket
  UiCloudFrontDistributionId:
    Description: Id of the UI CloudFront Distribution
    Value: !Ref UiCloudFrontDistribution
Here we simply define the values from this stack that we wish to look up later. We will need the UiBucketName and UiCloudFrontDistributionId in the deployment utility script.
That’s the whole infrastructure. You can also view the file in the demo repository.
Time to deploy
First, authenticate to the AWS CLI (e.g., using aws login, depending on your setup).
Once authenticated to AWS CLI — we are also automatically authenticated to the AWS SAM CLI. Now we need to do the following to go thru deployment process:
Build the SAM Template (this will transform our template.yml file to the required format by AWS):
sam build --config-env productionDeploy the infrastructure (replace the parameter overrides with your own):
sam deploy --config-env production --parameter-overrides Domain=moveworkforward.com DomainHostedZoneId=Z02**********We will be asked to confirm the changeset:

When the deployment finishes, SAM prints the outputs (Note: First deployment can take a few minutes. Especially certificate validation):

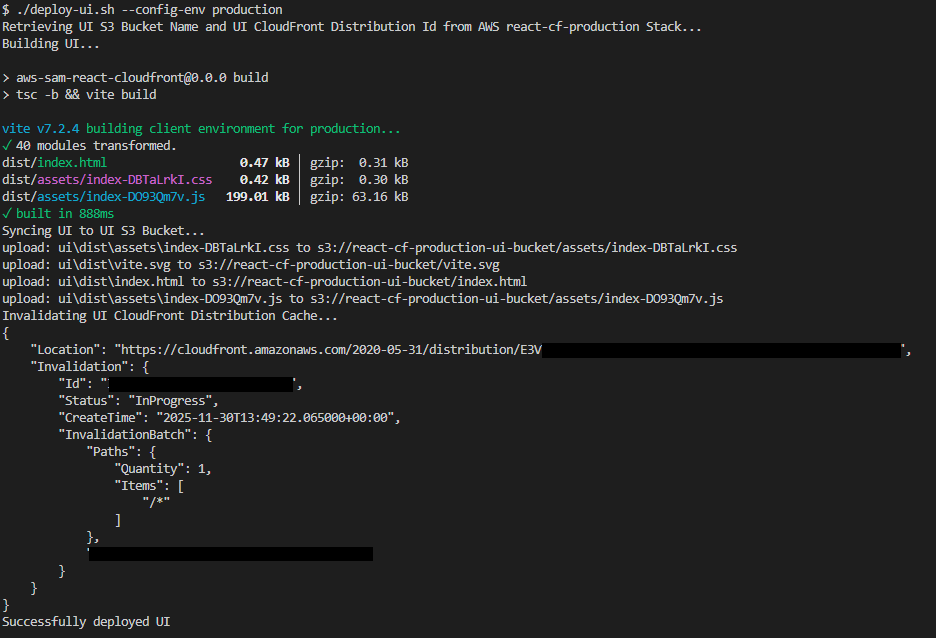
The last thing we have to do is deploy the UI:
./deploy-ui.sh --config-env productionThis builds the SPA, syncs it to S3, and invalidates CloudFront.
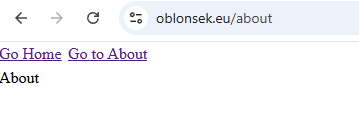
Now visit your domain and you should see the site live!
Conclusion
And that’s it. Once the infrastructure is in place, deploying a new version of the React app is as simple as running ./deploy-ui.sh. Hopefully this walkthrough and the SAM template save you some of the trial and error we went through along the way.
Feel free to check out our website if you’d like to learn more about what we do.
References: